[ad_1]
For many medical and recreational users, cannabis can be an expensive part of daily life. Home growing offers a practical, affordable alternative to retail.
That’s why I tried my hand at a personal grow using a self-contained, automated, hydroponic system.
I’ve never cultivated cannabis previously, but felt confident knowing the system I chose is mostly automated and was designed to have very little interaction from the grower.
The other bonus? Since I chose to work with the SpinnerXP, I enjoyed an eight-week grow cycle. A quick turnaround is just what I needed for my introduction to home-growing cannabis.
Why Automation is Awesome
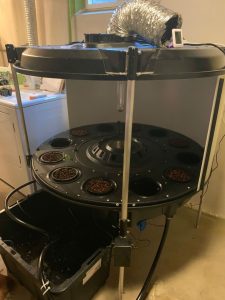
An automated system removes much of the guesswork associated with cultivation.
In many ways, a self-contained system like the Spinner XP allows the user to “set it and forget it,” which makes the process easy and approachable.
Further, automated systems can be much more efficient than traditional indoor grow operations and can increase yield considerably.
Before starting my home grow, there were several factors I considered.
It was important that the process would not take up much of my time, that it would be energy and water efficient, that it would have little odor, and I would yield enough to make the experiment worth my time.
The XP checked all of those boxes for me and the company was kind enough to send a unit to review.
Beginning Your Home Grow
After the system was delivered, I worked with Co-founder of Spinner USA David Baetens to set up the machine.

Installation normally takes 1-2 hours from start to finish, which mostly consisted of screwing parts together, setting timers, and conditioning the water for the plants.
We set the light (600W HPS) to an 18-hour “on” cycle for the first week, ensured the water was at the proper PH (between 5.8-6.1), and that all the pots inside were filled with clay pebble substrate.
The machine has 12 pots, but I grew six as that is the limit for recreational growers in the state of Colorado.
I selected an indica variety, Ogre Kush, as indica is typically shorter and broader than sativa plants.
A compact plant with tight nodal spacing is ideal for this particular machine, as the growing chamber is only 27” tall. In total, the unit has a footprint of roughly 12 square feet.
Another unique feature of the Spinner Grow system is that each pot slowly rotates 360 degrees before rotating in the opposite direction 360 degrees. The rotation allows each side of the plant to receive adequate light so it grows evenly in all directions, hence the name SpinnerXP.
Tending Your Plants
Lighting
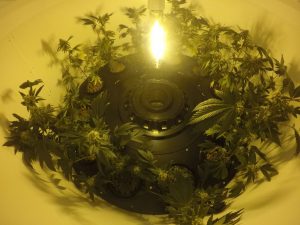
As I mentioned, the system uses a single 600W HPS bulb.
An 18-hour “on” light cycle for the first week helps the clones establish a healthy root system.
The entire Spinner system is automated on timers, including the lighting.
After the first week, I switched the light timer to 12-hours on and 12-hours off to encourage rapid budding.
Water and Nutrients
As this is a hydroponic system, the roots are constantly bathed in water and nutrients.
The system is set to refresh the water circulating around the plants roots once every hour, pulling in fresh water from the external reservoir and cycling for five minutes.
This cycle is set using another timer, and can be adjusted according to your needs. The cycle I described worked very well throughout the entirety of my grow.
Every day, it’s important to check the PH levels of your water. Be sure they stay consistently between 5.8-6.1.
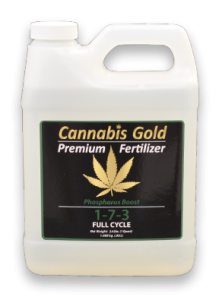
I used Cannabis Gold Premium Nutrients for the grow because they are exceptionally clean, leaving very little residue within the system.
They provided a nutrient chart formulated specifically for the SpinnerXP, which I used verbatim for my grow operation.
Ventilation and HVAC
The system I used has built-in ventilation, ensuring consistent airflow across all limbs of the plant. The air is circulated from the bottom of the unit to the top, where two vent fans ensure hot air is escaping the enclosure.
I placed a temperature and humidity gauge at the opening to this vent to track heat and humidity within the unit. The unit maintains a fairly consistent temperature. Mine stayed between 70-80 degrees Fahrenheit and around 40-50 percent humidity.
Other than checking those few variables (water PH, temperature, and humidity), I just looked in on my little plants everyday and made sure they looked healthy.
Pruning Your Plants
I didn’t realize how vital the pruning process would be when growing in a contained environment. For an experienced grower, this section may seem obvious. However, many new growers may struggle with this part of the process.
I started pruning the largest leaves off the plants during the fifth week. I pinched the top of the plants, hoping to encourage more growth in the lower branches while slowing down vertical growth.
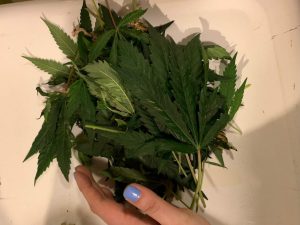
Space is limited with self-contained growing units. Without proper pruning, the plants may start to press against each other or against the walls of the unit. If the grower lacks experience and the plants are crowded, problems could arise from the plant touching the light. Thankfully, with proper pruning, this should never be a concern.
The plants looked so lovely that I was reluctant to prune as much as I should have. As such, I had to tie-up some limbs that were reaching too close to the bulb.
Further, when the plants press against each other they can break or damage other plants. This is particularly true once the plants become a bit larger and are still rotating. Without proper pruning, the machine’s rotation could result in damage.
After week five or so, it’s best not to prune the plants. The pruning causes them to release a hormone that prevents budding in favor of repairing the pruned sections.
Harvesting Your Cannabis
I began to flush my system at the beginning of the seventh week. I replaced all the water in the unit, as well as all of the water in the external reservoir, with clean water (no nutrients). This ensures the harvested product doesn’t retain any residual flavors or aromas from the nutrients.
After a week of cleansing, I trimmed off the largest leaves and then carefully cut the base of each plant, hanging them to dry one-by-one, leaving plenty of space between for air circulation.
I hung them in a clean, dark, dry space. I suspended each plant by its base (upside down) from a clothing line and placed a rotating fan about four feet away to facilitate drying.
Trimming and Curing
After a week of drying, I trimmed more leaves from the plants. Then, using clean trimming shears, began the somewhat tedious process of trimming the buds. Each bud is surrounded by small leaves.
I removed any leaves with a stem, then trimmed the finer leaves projecting from the buds. These are known as “sweet leaf” and can be saved for use in
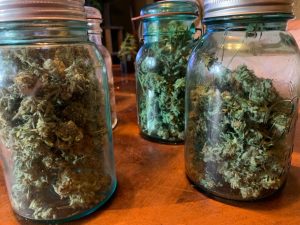
other cannabis products, such as creating butter or oil.
I lost two of my six plants during the growing process. One became tangled in the ties I had used to support the buds. The other just seemed to shrivel up.
From the four plants that survived, I harvested a dry weight of seven ounces, or just under a half pound.
I placed the buds in large glass jars with airtight lids, being careful not to overstuff the jars. Too many buds in one jar could lead to mold. Each day for the next week or two, I opened the jars to let fresh air in and prevent mold or mildew from forming. Glass will not impart any taste into one’s harvest.
Would I Grow Again?
I found the experience of growing at home to be very rewarding. It was fun to build a relationship with the plants as they grew.
I enjoyed tending them to ensure proper development and ultimately seeing the outcome of my hard work. It was more economical than purchasing the same amount from a dispensary, particularly at recreational prices.
More so, the trimmings from the plant could easily be processed to form a wider variety of cannabis products, such as topicals or edibles, adding further value to the process.
For a medical marijuana patient, growing at home with a self-contained system like the SpinnerXP could be an excellent option for saving money. It’s fairly idiot-proof, just requiring fifteen minutes or so each day and maybe a dedicated hour a week for water changes.
If one has any passion whatsoever for gardening or agriculture, cultivating with the SpinnerXP is a pleasurable and rewarding experience that you’re likely to invest in again and again, harvest after harvest.
To learn more about growing at home using automated systems, stay tuned to Cannabis & Tech Today for the next home-grow installment. We’ll dive deeper into the mechanics of the SpinnerXP, reveal more data about the growth cycle, and provide a detailed overview of nutrients and feeding cycles.
[ad_2]
Source link